Friday 31 July 2015

just an experiment....


as you surely know, watercoloring is the newest trend - and of course
this is a trend i have to try...

All you need for this experiment is:

Sizzix Big Shot Plus Starter Kit (White & Gray)
Sizzix Textured Impressions Embossing Folder - Chevron Texture
Sizzix Framelits Die Set 5PK - Stars
Watercoloring Paper, Watercolors and of course water...


First of all you have to emboss the paper.
I choose the Sizzix Textured Impressions Embossing Folder - Chevron Texture.

But this time you do not only dry embossing - first you add
water and color onto the embossing folder - wet embossing quasi ;-)


Then i added the paper and put it into the the Big Shot...
a little decorating.... perfect...


Have a beautiful weekend, Stephanie


*****

Hallo Ihr Lieben,

wie ihr sicher wisst, ist Wasserfarben-Matschen gerade total in....
Und das ist ein Trend den ich auch versuchen muss....

Für das Experiment braucht ihr:

Sizzix Big Shot Plus Starter Kit (White & Gray)
Sizzix Textured Impressions Embossing Folder - Chevron Texture
Sizzix Framelits Die Set 5PK - Stars
Aquarell Papier, WatercolorWasserfarben und natürlich Farben...

Zuerst müsst ihr das Papier embossen.
Ich habe mich für den Sizzix Textured Impressions Embossing Folder - Chevron Texture entschieden.

Aber diese mal wird nicht einfach trocken embosst.
Zuerst muss noch Wasser und Farbe in den Folder - Nass Embossen sozusagen ;-)

Papier rein und durch die BigShot kurbeln.
Ein bisschen dekorieren, fertig....

Ich wünsche euch ein wunderschönes Wochenende, Steffi

A jar like a photo frame!


Hi Sizzix friends!

Today I want to show you a new home decoration I’ve created. It is a jar, that match the sea frame I'd shown you two weeks ago. I’ve decorated the jar with the beautiful Tribal hearts die used like a bunch.  Let me show you!


I have used a beans glass that I've painted with blue chalk paint. 


Then I’ve die-cut some kraft and white cardstock hearts and combine them to create heart flowers.  I’ve also decorated wooden skewers with a decorative ribbon.


These die-cutting hearts are so beautiful!!! 


To finish the jar I’ve also decorated with a kraft heart die-cut a piece of burlap, a ribbon and 
a rope lace.


This summer my home decorations are in blue, kraft and white colours.


The result is a beautiful home decoration to use like a frame!!! 


I have used the following Sizzix products:


Other supplies used:
White cardstock 
Kraft cardstock
Burlap
Ribbons
Wooden skewers
Rope


I hope you have enjoyed this decorative family jar. Thanks for your visit!


Have a creative and happy Friday!


------------------------♥------------------------♥--------------------------♥------------------------

¡Hola a todos!

En el post de hoy os quería enseñar la última decoración que he hecho para casa. Se trata de un bote reciclado que conjunta con el cuadro marino que os enseñé hace un par de semanas. El bote lo he decorado utilizando el troquel Tribal hearts ...¡Me encantan estos corazones! imitando un ramo. Pero mejor os lo enseño.

Se trata de un bote de judías que he reciclado pintándolo con pintura chalk azul provenza.
He troquelado en kraft y blanco y los he combinado para crear las flores de corazones. También he decorado unos palillos largos con cinta decorativa. 
¡Me encanta este troquel!
Para acabar de decorar el jarrón he utilizado uno de los corazones troquelados en kfrat, arpillera, cinta de tela y he hecho una lazada con cuerda.
El resultado es un bonito jarrón para utilizar cómo porta fotos!!!


He utilizado los siguientes productos Sizzix:


Otros materiales utilizados:
Cartulina blanca
Cartulina Kraft
Arpillera
Cintas
Palillos largos
Cuerda


Espero que os haya gustado este jarrón porta fotos familiar. ¡Gracias por vuestra visita!


¡Feliz y creativo viernes!


Creative Curves - Part one


Hi, Trudi here from Quilting Prolifically.  I've been working on curved piecing, having started on a whole series of Double Wedding ring inspired quilts.  Ambitious I know, but I have one under my belt already, and a second started.  But sometimes all those curves can be a little intimidating, so I wondered if I could create the illusion of curves without the curved piecing.

Yes you can!


so armed with my Sizzix Bigshot Plus and the following dies

659838 Bigz Square 4 1/2"
659832 Bigz Half Square Triangle 4 1/2" pieced
659853 Bigz L Isosceles & Right 4 1/2" H 
 657611 Bigz Half Square Triangle 2 1/2" pieced


and my recently overflowing scrap bin   ....


I set to making a whole bunch of Half Square Traingles,  


Because when it comes to quilts, I sort of love a big bed size quilt, I pieced and pressed these in sets of 10's so I could keep track I had the right amount made.  and if I lost count, it was easy to recount at a glance!


mix in a few squares, and the Shoo Fly blocks are done 


all 18 of them!

next up was piecing the other block, but, with Festival of Quilts looming fast, my progress has been put on hold, while I finish my entries for delivery next week


so I'll be back next month to show you these blocks, how I pieced them, and how when you put both the blocks together you create the illusion of curves without a curve in sight. 

Of course, add in a little quilting and the whole thing should come together nicely! 

See you soon!  Trudi


Creative ideas for summer party


Hi everyone, It’s Anna here and I'm so excited to be here today sharing a fun idea for Summer!
I love the new Sizzix Big Shot Plus starter Kit! I’m going to show you how to use this kit and two other dies for your summer party. I used also the nice flower from Botanical Bloom collection design by Craft Asylum.
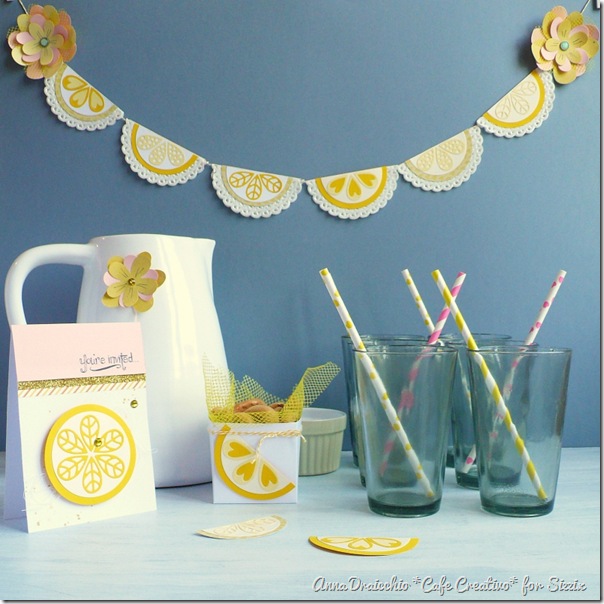
With a bright yellow selection of lemons and flowers, I created: garland, little baskets and party invites.
There is nothing like enjoying refreshing citrus on a warm summer’s day! ;)
 
summer party idea-tutorial-sizzix bigshot plus starter kit (1)
 
This is a little basket for snacks, that I created with box Thinlits:
 
summer party idea-tutorial-sizzix bigshot plus starter kit (3)
 
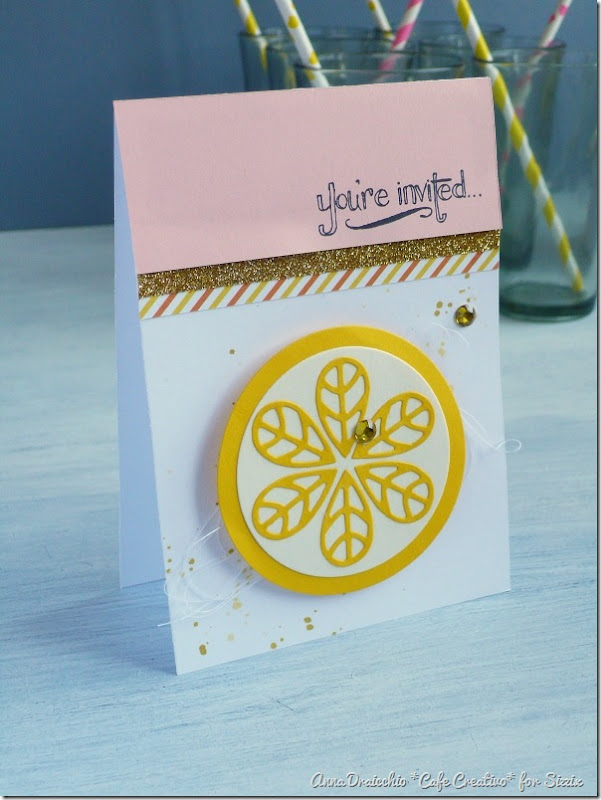
This is my fresh party invitation card:
 
summer party card-tutorial-sizzix bigshot plus starter kit
 
Let's party!!!
 
summer party idea-tutorial-sizzix bigshot plus starter kit (2)
 
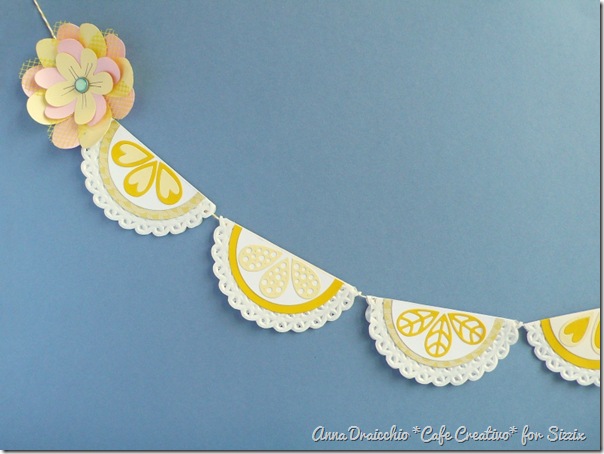
Let me explain you how to make the garland:
1- Fold the paper doilies in half.
2- Created your lemon using two circles (cut in half) and three leaves of Starter Kit. Assemble the lemon and add to the doily.
3- Place twine between the layers of any doily and glue together.
4- Cut out more flowers using Bigz Die - Bountiful Botany #2 , I used also a piece of mesh bag of lemons to created a flower. Layer the shapes to created two beautiful flowers and add.
So, is an easy and fun way to set the scene at your next party or celebration!
summer party idea-tutorial-sizzix bigshot plus starter kit (4)

Sizzix Cutting Pads are now colored in a new delicious flavor: mint!!! With striking color, these deliciously colored Cutting Pads can be easily spotted on any work station.
I used also the useful Magnetic Platform for Wafer-Thin Dies. For perfect registration, this Magnetic Platform uses high-grade magnets to hold Thinlits, Framelits and other chemically-etched, wafer-thin dies securely in place during cutting.

summer party idea-tutorial-sizzix bigshot plus starter kit (5)
 
Hope you like it and I inspired you to create something pretty with your Big Shot Plus!
Thanks so much for visiting me today
 
Items used:
cardstocks
patterned papers
paper doilies
mesh bag of lemons
twine
brads
 
**************************************
Flag_of_Italy
Per le amiche italiane! :)
Ciao a tutti, sono Anna e sono felice di condividere con voi un'idea divertente per l'estate.
La nuova Sizzix Big Shot Plus Starter Kit mi piace tantissimo, non lo nego! Infatti sto per mostrarvi come usare il kit e altre due fustelle per abbellire le feste d'estate. Ho usato anche il delizioso fiore della collezione Botanical Bloom by Craft Asylum.
Con una bella selezione di sfumature gialle, sotto forma di limoni e fiori, qualche tocco di rosa, ho creato diverse decorazioni, come una ghirlanda, dei cestini e naturalmente gli inviti.
Non c'è nulla come gli agrumi per rinfrescare una calda giornata d'estate, non credete?! ;)

I cestini li ho creati con la fustella Thinlits scatolina, mentre ora lasciate che vi spieghi come fare la ghirlanda (in fondo trovate l'elenco dei materiali):
1- Piegare i centrini di carta a metà.
2- Creare i limoni con due cerchi (tagliati a metà) e tre foglie dello Starter Kit. Assemblare il limone e incollarlo al centrino.
3- Mettere lo spago tra gli strati del centrino e incollare insieme.
4- Tagliare diversi fiori utilizzando la fustella Bigz Die - Bountiful Botany #2 , ho usato anche un pezzo di rete dei limoni per creare un fiore, visto che le fustelle Bigz sono in grado di tagliare anche più strati di questo materiale. Sovrapporre le forme di fiori, per creare due bei fiori da mettere all'inizio e alla fine della ghirlanda.
Ecco un modo semplice e divertente per creare un po' di scenografia alla vostra prossima festa d'estate!

Ah avete visto un'altra novità??? Ora i Cutting pads sono anche di colore verde menta!
Sarà capitato anche a voi con quelli completamente trasparenti, di non riuscire a "vederli" sul tavolo di lavoro. Con questo nuovo colore, possono essere facilmente trovati e non si mimetizzeranno più con le carte e tutto il caos creativo che regna sovrano! In policarbonato di alta qualità, questi nuovi cutting pad colorati vi accompagneranno per migliaia di tagli con le vostre amatissime fustelle!

Come si vede dalle foto, per questo progetto ho usato anche la Standard Magnetic Platform for Wafer-Thin Dies, la piattaforma magnetica, perchè è molto più comoda se si usano le fustelle sottili (Framelits e Thinlits). Queste si appoggiano e non si spostano! Perfetto!

Bene, spero che il progetto di oggi vi abbia ispirato a creare qualcosa di bello con la nuova Big Shot Plus!
Grazie per la visita
 
Materiali:
Sizzix Big Shot Plus Starter Kit (White & Gray) (660515) (macchina formato A4+fustelle+carte)
cartoncini
carte scrap
centrini di carta
rete dei limoni
twine
brad

Thursday 30 July 2015

Wedding rice cones


Hi Sizzix Friends!!
I often find myself creating wedding favors and accessories for brides!
Today I want to share with you the creation of delicious Wedding Rice Cones, perfect to enjoy with the newlyweds, leaving the church.
For this project I used the new Embossing Folder-Botanical Swirls by Rachel Bright.

I used:
Sizzix Big Shot Plus Starter Kit 660515
Sizzix Textured Impressions Plus Embossing Folder 660579
Sizzix Sizzlits Decorative Strip Die-Eyelet Lace and Scallops 660395
White Rectangular Cardstock
Hot glue
Scissors
Ribbons
Embellishments
Take the white rectangular cardstock and embossing with Sizzix Textured Impressions Plus Embossing Folder 660579. Fold the embossed cardstock to form a cone and fix the flaps with hot glue.
Die cut a white border using Sizzix Sizzlits Decorative Strip Die-Eyelet Lace and Scallops 660395. Paste it on the front of cone. Decorate with ribbons and embellishments like I did.
Fill the cones with rice and sugared almonds or with flower petals!!

 Really wonderful, is not it ??
See you the next time!!

-PER LETTORI ITALIANI-
Ciao Amici!!!
Come molte di voi sanno, spesso mi ritrova a creare bomboniere e accessori per spose!
Oggi voglio presentarvi un accessorio in particolare che non può mancare in un matrimonio,
il conetto portaconfetti, riso o petali!!
Questa creazione l'ho ottenuta grazie alla nuova Cartella per Goffrature a Rilievo firmata Rachel Bright.
Ho usato:
Sizzix Big Shot Plus Starter Kit 660515
Sizzix Textured Impressions Plus Embossing Folder 660579
Sizzix Sizzlits Decorative Strip Die-Eyelet Lace and Scallops 660395
Cartoncino bianco rettangolare
Colla a caldo
Forbici
Nastrini
Abbellimenti a piacere
Prendere il cartoncino bianco rettangolare e goffrarlo con Sizzix Textured Impressions Plus Embossing Folder 660579. Piegare il cartoncino così ottenuto per formare un cono, fissare i lembi con colla a caldo. Fustellare un bordo con cartoncino bianco usando Sizzix Sizzlits Decorative Strip Die-Eyelet Lace and Scallops 660395 e incollarlo sulla parte anteriore del conetto.
Decorare il cono con fiori secchi, foglie e nastrini, come ho fatto io!
Adesso riempire il cono con riso, confetti oppure, se preferite, con petali di fiori!!
Davvero bellissimo, non trovate anche voi???

Vi ringrazio per avermi seguito fin qui e vi aspetto al prossimo appuntamento!


Turbulence of butterflies - part 2


 Hello again, I'm starting to get excited about the Festival of Quilts - I hope you are too.
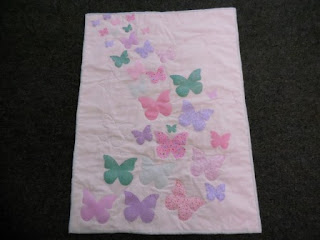
I have finished the little butterfly quilt that I started last week -
 
First of all I hand stitched the butterflies - because I had 5 hours travelling in one day so thought I would put the time to good use.
I wasn't sure what to do for the quilting - which is done by machine (as I don't have anymore long journeys planned), and then I thought of using the butterfly as a template to draw around to quilt -
 blue butterfly is the template, and I used an air erasable pen to draw around it -
 
I only used the large and medium butterflies as templates, and I spaced them in the blank areas of the quilt, and then shadow quilted around some of the fabric butterflies as well.
I like the back of the quilt too -
 and think I might make some cushions with just quilted butterflies.
I have started making another butterfly quilt and this time I'm going to fuse the butterflies in place, and then layer up the quilt and stitch around the butterflies as the quilting.
Meanwhile - I thought the butterfly die would make a nice decoration on a hairband for a baby - so with some white stretch lace, and my trusty Big Shot machine - http://www.sizzix.co.uk/product/660200/sizzix-big-shot-machine-only-white-gray  and the Echo Park Butterfly Trio Bigz die -http://www.sizzix.co.uk/product/660448/sizzix-bigz-die-butterfly-trio
I cut out 1 small and 1 medium butterfly from double sided fabric (I did this by fusing 2 layers of fabric together with heat and bond).
Then it's really easy to cut the stretch lace to the correct length - and pleat the ends, and overlap and then stitch -
Pin and then sittch the butterfly in place to conceal the join -

I stitched initially with back stitch and then added French knots to add texture to the centre.
I think I'm going to be making quite a few of these!
So that's all for this week - hope to see you next week at the Festival of Quilts -
there will be 3 of us demonstrating the Big Shot machines and Bigz dies -
I will be demonstrating with Lady Sew and Sew,
Beth will be with Cotton Patch and
Mandy will be with Abakhan
Hope to see you next week.
Angela


Summer Mini Book by Karine


Mini Album Happy!

This is my very latest mini book. I will present it after the summer holidays!
It is 100% handmade and reminds us of summer, holidays, nature and outdoors strolls! We will learn how to create our book from A to Z with the help of die cuts, folding techniques and we will play with colours. This is a technical and magical mini book where the focus is on Brushos!

Supply list:

Papers: Crate Paper
Cardstock, Alphabets: American Crafts
Stickers: Pebbles
Chipboards: Heidi Swapp
Embellishments: Ephéméria
Others: Brushos

Dies:

650515 :  Sizzix Big Shot Plus Starter Kit
660320 :  Sizzix Precision Base Plate for Intricate Thinlits Dies
660815  Sizzix Thinlits Die Set 3PK- Woodland Leaves
660804  Sizzix Thinlits Die Set 3PK- Happiness Phrases
659573 :  Sizzix Sizzlits Decorative Strip Die- Spring Grinery

After having created a textured white cover, I used the leftover paper scraps to cut some embellishments with the Big Shot Plus.

I put the emphasis on leaves and words with summer connotations such as Hello Sunshine so as to match my album theme.

I used my precision base plate to cut the thinner shapes. I can’t stop using it at the moment! It is really perfect to cut thin dies. This is a must-have, believe me!

The words Hello & Sunshine will stay as is color-speaking (white) and will be glued with liquid glue. I like the textured effect that brings material in a soft way.

The other die cuts (foliage etc…) are colored in green with the help of Brushos (but spray inks will do too). Let them dry then glue them as you will do with classic embellishments.

I also cut and inserted a mini leave from the Big Shot Plus kit.

Here are some images and zooms of the album!


Have a lovely day,

Karine


Mini Album Happy !

Voici mon tout dernier mini album que j'aurai le plaisir de présenter dès la rentrée !
Un mini 100% fait main qui sent bon l'été, les vacances, la nature et les balades en plein air ! Nous apprendrons à construire notre mini de A à Z à base de découpes, pliages et jeux de couleurs. Un mini abum technique et magique dans lequel les Brushos seront à l'honneur !

Matériel :

Papiers : Crate Paper
Cardstock, Alphabets : American Crafts
Stickers : Pebbles
Chipboards : Heidi Swapp
Embellissements : Ephéméria
Autres : Brushos

Dies utilisés :

650515 :  Sizzix Big Shot Plus Starter Kit
660320 :  Sizzix Precision Base Plate for Intricate Thinlits Dies
660815 :  Sizzix Thinlits Die Set 3PK- Woodland Leaves
660804 :  Sizzix Thinlits Die Set 3PK- Happiness Phrases
659573 :  Sizzix Sizzlits Decorative Strip Die- Spring Grinery

Après avoir réalisé ma couverture tout en blanc texturé, je me suis servie des chutes pour découper mes embellissements à la Big Shot Plus.

Vu la thématique de mon album, j'ai mis l'accent sur les dies feuilles et les mots qui évoquent l'été comme Hello Sunshine.

Pour couper les plus fins, j'ai utilisé ma plaque de précision que je ne quitte plus ! Elle est vraiment géniale pour découper les dies les plus fins, l'essayer c'est adopter, croyez-moi !

Les mots Hello et Sunshine sont laissés en blanc et sont collés avec de la colle liquide. J'aime ce côté texturé qui apporte de la matière tout en douceur.

Les autres découpes, comme les feuillages sont teintées en vert. J'ai utilisé pour ce faire des Brushos, vous pouvez également utiliser des encres en spray. Laissez sécher puis collez directement sur vos pages en embellissements.

J'ai également découpé et utilisé une mini feuille du kit Big Shot Plus.

Je vous laisse avec quelques visuels et zooms !

Bonne journée

Karine