Hi again!
I don't know about you guys, but often I look at the Sizzix dies with different eyes.
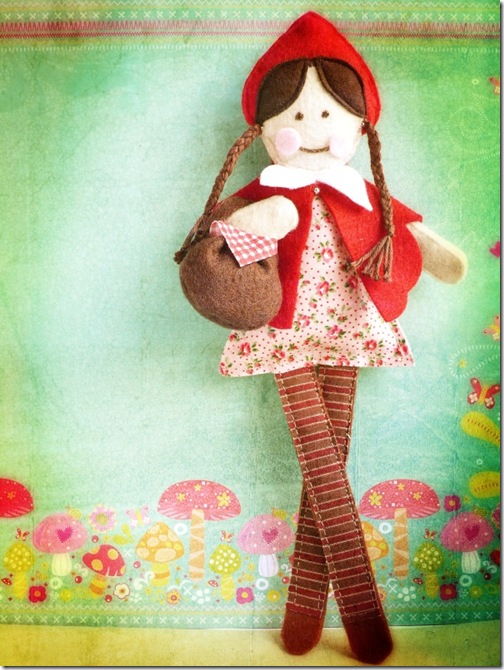
I adore Little Red Riding Hood! Here is a tutorial I put together for this little doll. How cute! It was so much fun to make it, I hope you love it as much as I do!
I adore Little Red Riding Hood! Here is a tutorial I put together for this little doll. How cute! It was so much fun to make it, I hope you love it as much as I do!

Items used:
Sizzix Big shot machine (655268)
Sizzix Bigz Die - Heart, Stem & Leaves (657691)
Sizzix Bigz Die - Circles (656333)
Sizzix Bigz Die - Owl #2 (657694)
felt: cream, red, brown, white, pink
scrap of fabric
polyester stuffing
iron-on interfacing
ruler, scissors etc
yarn
sewing machine
How to make:
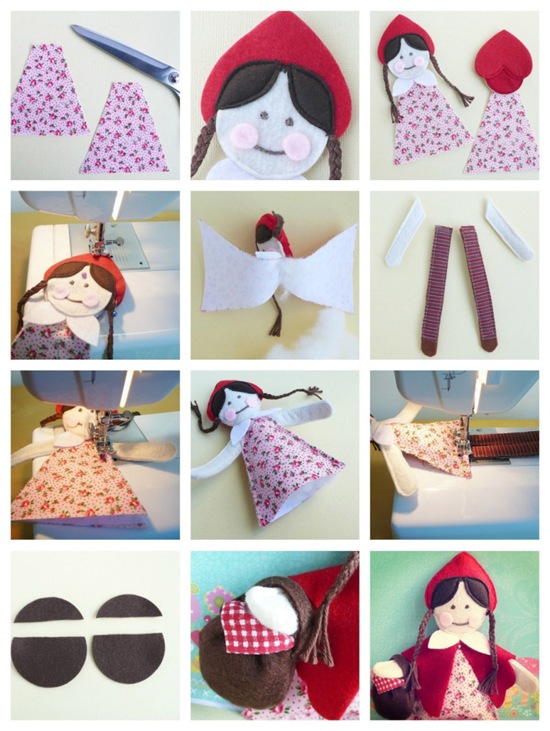
1- Use your Sizzix Machine and Sizzix Bigz Die - Circles (656333) to make the doll’s face with cream felt. Use Sizzix Bigz Die - Heart, Stem & Leaves (657691) to cut out red hearts (hood), white and brown leaves. Lastly, cut a little circle pink to make the cheeks with Sizzix Bigz Die - Owl #2 (657694).
Cut 2 of each piece.
Cut 2 of each piece.

2- To make the cape: take a piece of red felt 18x8 cm and fold in three parts, as shown in photo. Place the folded felt on the heart die 657691 and cut. Before making this, carry out a test with paper.

3- If you are using cotton fabric for the dress, make sure you use thick interfacing or batting. Cut two triangles. Sew the white leaves to make the collar.
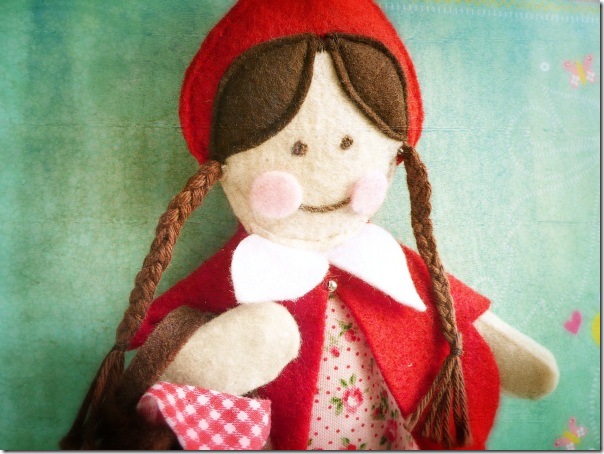
4- Sew the cream circle into the red heart. Hand stitch the face. Make two braids with wool and sew to the back of doll’s head. Sew on the bangs.
5- Add the head to the dress, front and back. Sew the head front to the head back.
6- Stuff the head with fluff.
8- Cut and sew arms and legs together.
4- Sew the cream circle into the red heart. Hand stitch the face. Make two braids with wool and sew to the back of doll’s head. Sew on the bangs.
5- Add the head to the dress, front and back. Sew the head front to the head back.
6- Stuff the head with fluff.
8- Cut and sew arms and legs together.

9- Sew the dress front to the dress back making sure you sew the arms inside as you go around.
10- Stuff the dress with fluff.
11- Sew the dress and the legs. Add the cape.
12- Use your Sizzix Machine and Sizzix Bigz Die - Circles (656333) to make the basket with brown felt. Cut a piece of the circle. Use the small part to make the handle. Sew the basket. Add the little scrap of fabric to make the napkin.
Ta-da you have your very own sweet Little Red Riding Hood Doll!
I shall be back Friday to share with you another Sizzix project.
I shall be back Friday to share with you another Sizzix project.
Happy crafting!

**************************************
Non so voi, ma spesso mi viene da guardare le fustelle Sizzix con occhi differenti. E' così che un cuore diventa un cappuccio, un cerchio un viso o un cestino, delle foglie si trasformano in capelli... Ecco comparire nella mia mente… un mondo di fiaba con Cappuccetto Rosso!
Quindi oggi sono qui a condividere con voi un tutorial per creare questa dolce bambolina. E' stato un progettino molto divertente da fare, spero che vi piaccia tanto quanto è piaciuto a me!
Prepariamoci quindi a lavorare con feltro e stoffa oggi!
Quindi oggi sono qui a condividere con voi un tutorial per creare questa dolce bambolina. E' stato un progettino molto divertente da fare, spero che vi piaccia tanto quanto è piaciuto a me!
Prepariamoci quindi a lavorare con feltro e stoffa oggi!
Materiali:
Sizzix Big shot machine (655268)Sizzix Bigz Die - Heart, Stem & Leaves (657691)
Sizzix Bigz Die - Circles (656333)
Sizzix Bigz Die - Owl #2 (657694)
feltro nei colori: panna, rosso, marrone, bianco, rosa
ritagli di stoffa
cotone lanato o lana marrone
ovatta sintetica per imbottire
tela termoadesiva
righello, forbici ecc
fili in tono
macchina da cucire
ritagli di stoffa
cotone lanato o lana marrone
ovatta sintetica per imbottire
tela termoadesiva
righello, forbici ecc
fili in tono
macchina da cucire
Procedimento:
Io ho usato in gran parte la macchina da cucire, ma voi potete cucire a mano o incollare, secondo le vostre preferenze.
1 - Usare la macchina Sizzix e la fustella Bigz Die - Circles (656333) per creare il viso della bambolina con il feltro panna. Utilizzare la fustella 657691 per tagliare i cuori rossi e le foglie bianche (saranno il colletto) e marroni (la frangia dei capelli). Infine, tagliare un cerchietto rosa per realizzare le guance con Sizzix Bigz Die - Owl # 2 (657694). Tagliare due per ogni pezzo.
2 - Per fare la mantella: prendere un pezzo di feltro rosso di circa 18x8 cm e piegarlo in tre parti, seguendo un po’ l'inclinazione della fustella cuore, come mostrato nella foto. Posizionare il feltro ripiegato sulla fustella cuore 657691 e tagliare. Prima è meglio effettuare una prova con la carta per vedere di realizzare la forma della mantella desiderata.
3 - Se per il vestito si utilizza tessuto di cotone, assicurarsi di stirare la tela termoadesiva, per renderlo più rigido. Dal tessuto prescelto tagliare due triangoli e smussare l'angolo in alto. Cucire le foglie bianche per creare il colletto.
4 - Per il davanti: cucire il cerchio panna sopra il cuore rosso posizionato a testa in giù. Ricamare il viso, creando occhi e bocca e cucendo le guance. Fare due trecce di lana e appuntarle nella parte posteriore della testa della bambolina. Cucire la frangia. Per il retro: cucire il cerchio panna sul cuore rosso, se si vuole aggiungere tra questi un cerchio rosso, per creare meglio il cappuccio.
5 - Cucire la testa al vestito, sia per il davanti che per il dietro. Cucire insieme le due parti della testa, davanti e dietro.
6 - Riempire la testa con l'imbottitura.
8 - Braccia e gambe sono delle strisce semplici di feltro, scegliete voi la lunghezza desiderata. Dal feltro panna tagliare le braccia, da quello marrone tagliare le lunghe gambe, due pezzi ciascuno. Se volete usate anche del tessuto a righe per le calze, da posizionare sopra. Cucire insieme le parti per renderle doppie e più rigide.
9 - Cucire il vestito (davanti con dietro) facendo attenzione a cucire assieme anche le braccia, posizionate per una piccola parte all'interno.
10 - Riempire il vestito con l'ovatta sintetica.
11 - Cucire la parte bassa del vestito con le gambe. Appuntare la mantella sotto al colletto.
12 - Usare la macchina Sizzix per tagliare due cerchi marroni che serviranno a creare il cestino della merenda. Ai cerchi di feltro marrone tagliare la parte superiore, come in foto. Utilizzare la parte piccola per fare il manico, ritagliando una strisciolina. Cucire il cestino, assemblando assieme le due parti di cerchio, arricciando un po' il bordo in alto. Fissare il manico. Aggiungere un quadratino di stoffa per fare il tovagliolo e se volete un po' d'imbottitura per tenere bello gonfio il cestino.
Ta-daaaa! Ecco che avete la vostra dolcissima Cappuccetto Rosso!
Per oggi finisce qui, tornerò venerdì per condividere con voi un altro progetto Sizzix, questa volta con la carta ;)
Happy Crafting!

No comments:
Post a Comment